How to Make the Most of Your Squarespace 7.1 Site
Congratulations, you have made the move to Squarespace 7.1! If you are looking for ways to customize your site even further, here are some of our go-to customizations that will enhance your visitor experience and level up the overall feel of your site. We will keep this resource updated as we vet and utilize additional customizations for our site as well as our clients’ sites.
Quick links:
Customizations That Aid SEO
Adding Breadcrumbs to Squarespace
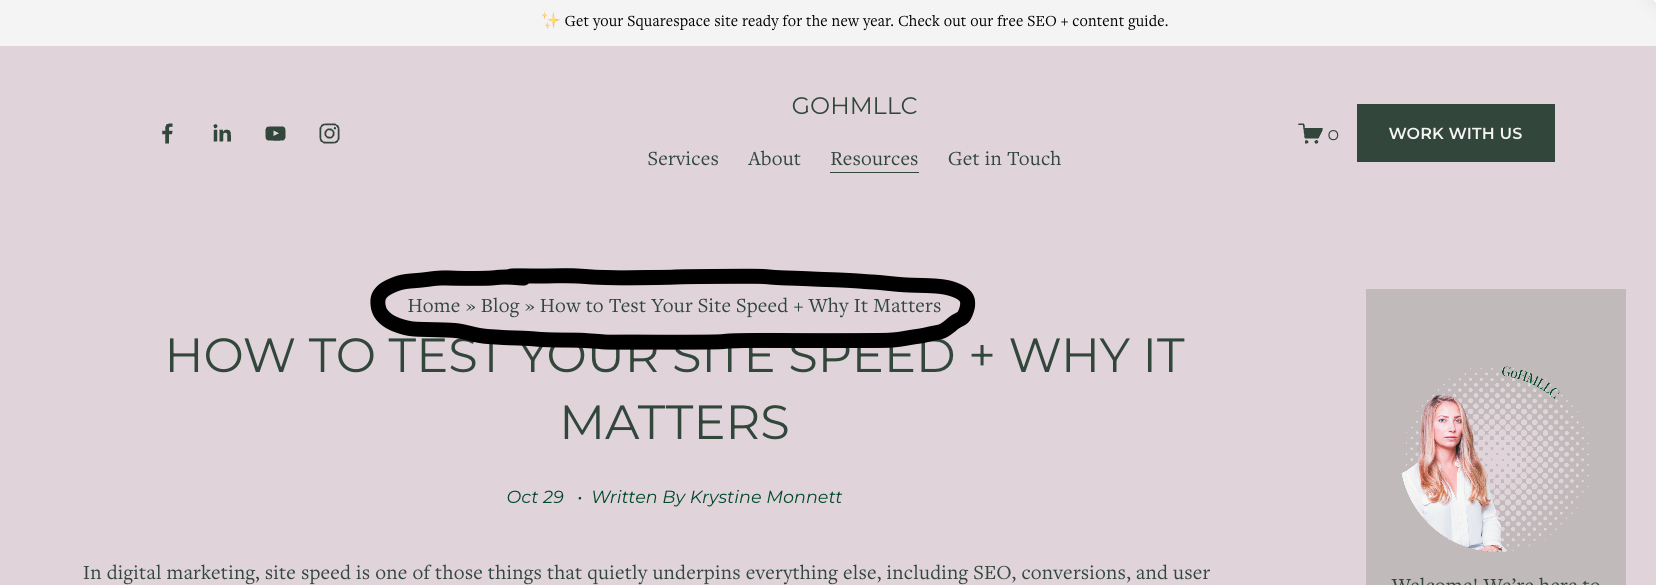
Breadcrumbs are a secondary navigational tool that allow visitors to understand where they are in the site’s hierarchy. This is not only helpful for visitors, but it also aids search engines to help understand and categorize your site structure. For sites with organized blog or product categories, you can easily add breadcrumbs to your site by simply using a little bit of code.
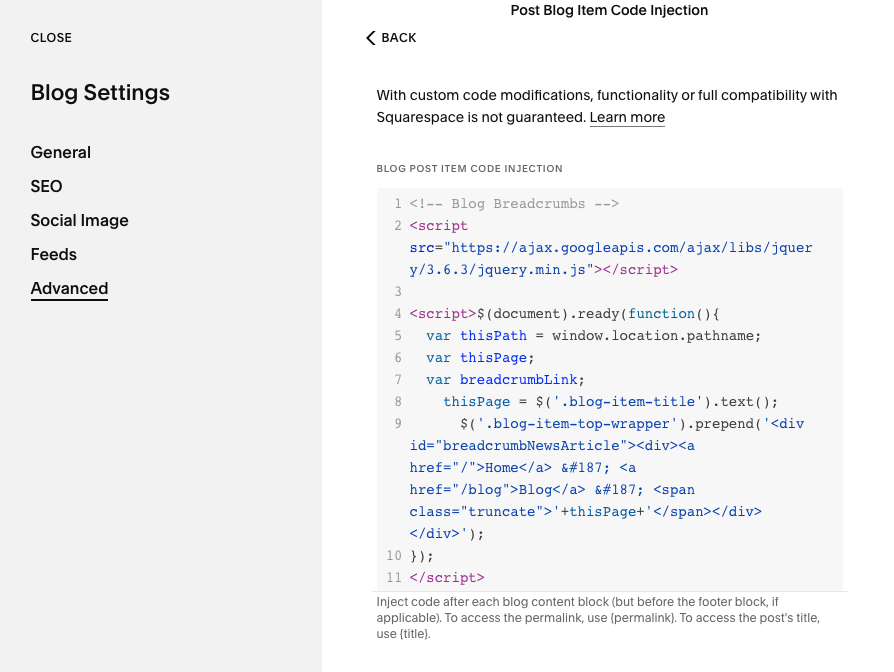
If you only have one blog or category, you can add the following code into your global header settings via code injection. If you have two or more blogs/categories, you will want to do this in individual blog settings via blog post code injection.
<!-- Blog Breadcrumbs -->
<script src="https://ajax.googleapis.com/ajax/libs/jquery/3.6.3/jquery.min.js"></script>
<script>$(document).ready(function(){
var thisPath = window.location.pathname;
var thisPage;
var breadcrumbLink;
thisPage = $('.blog-item-title').text();
$('.blog-item-top-wrapper').prepend('<div id="breadcrumbNewsArticle"><div><a href="/">Home</a> » <a href="/blog">Blog</a> » <span class="truncate">'+thisPage+'</span></div></div>');
});
</script>
Make sure you double check the bolded sections and update accordingly.
Anchor Links in Squarespace
Anchor links, or jumplinks, are hyperlinks that take users to a specific section of the current page. This is helpful for long pieces of content, aiding user-experience and engagement. Squarespace 7.1 has a native feature for adding anchor links; however, keep in mind that this doesn’t work for blogs, events, portfolios, or store sections. Fortunately, there is a work around (you can see an example in this guide).
Using Squarespace Features:
For standard pages, you can use the built-in anchor link functionality.

Within the section settings, scroll to the anchor link section and name your anchor link
Copy the text using the copy icon
Add a text block or hyperlink existing text to use as your anchor text
In the URL section, add the copied anchor link from the section settings
Make sure you save
Adding Anchor Links to Blog Posts:
If you have a long piece of content on your blog or other unsupported sections, you can still create anchor links with a little bit of code.

Add a code block above the section you want the anchor link to go
In the code block, add <div id="design-considerations"></div> and update the highlighted section to match your content
Add a hyperlink #design-considerations and be sure to update to match the code block
Save*

*Sometimes Squarespace is finicky, so be sure to save often and check to ensure that your anchor links are working correctly.
Style Customizations
Custom 404 Pages
The default 404 page in Squarespace is pretty lackluster, and unfortunately, you cannot customize it either. You can, however, create a new 404 page and add details that are helpful to your audience. Here is a video walkthrough:
Cart Page Styling
If you sell anything on your site, a cart symbol will automatically be added. If you are not happy with the default appearance of the cart page, you can add some custom CSS to match the aesthetic of your site.
Step 1. Navigate to Pages → Custom Code → Custom CSS
Step 2. Add the following code, adjusting as needed to match your brand
.cart {background-color:#33463b;
}
.cart {color: #f4f4f4 !important;
}
.cart-title
{color: #f4f4f4 !important;
}
Step 3. Save + Confirm
Functionality Customizations
Ensure Social Links Don’t Open in a New Tab
For accessibility purposes, it is not recommended to have any links set to open in a new tab. However, by default, your social media links will open in a new tab. You can override this through the following steps:
Step 1. Navigate to Pages → Custom Code → Code Injection
Step 2. Add the following code in the footer code section:
<script>
document.addEventListener('DOMContentLoaded', function() {
// Target social links in the header (if applicable)
const headerLinks = document.querySelectorAll('a.icon');
headerLinks.forEach(function(link) {
link.removeAttribute('target');
});
// Target social links in Social Links Blocks
const socialLinksBlocks = document.querySelectorAll('.sqs-block-social-links a');
socialLinksBlocks.forEach(function(link) {
link.removeAttribute('target');
});
});
</script>
Step 3. Save + Confirm
Search Block + Results Page Customizations
Search blocks are a great built-in feature for Squarespace, but it doesn’t always align with your site’s aesthetic. You can customize this using CSS.
Step 1. Add a search block if you don’t already have one
Step 2. Update your content settings to choose what you want the search results to pull from (ex. only your blog or your entire site)
Step 3. Save
Step 4. Navigate to Pages → Custom Code → Custom CSS
Step 5. Add the following code, adjusting bolded sections as needed to match your brand
.search-input{
border:3px solid #33463b!important;
border-radius: 15px;
}
.search-input:focus{
outline: none!important;
background-color: #dfd4da
box-shadow: 0 0 8px #c0baba;
}
Step 6. Save + Preview
Once you are happy with how the search block looks, you can move on to the search results page itself!

Step 1. Navigate to Pages → Custom Code → Custom CSS
Step 2. Add the following code, adjusting bolded sections as needed to match your brand
.sqs-search-page-input{
border:3px solid #33463b!important;
border-radius: 15px;
}
.sqs-search-container-item em {
background: #33463b;
}
Step 3. Save + Preview
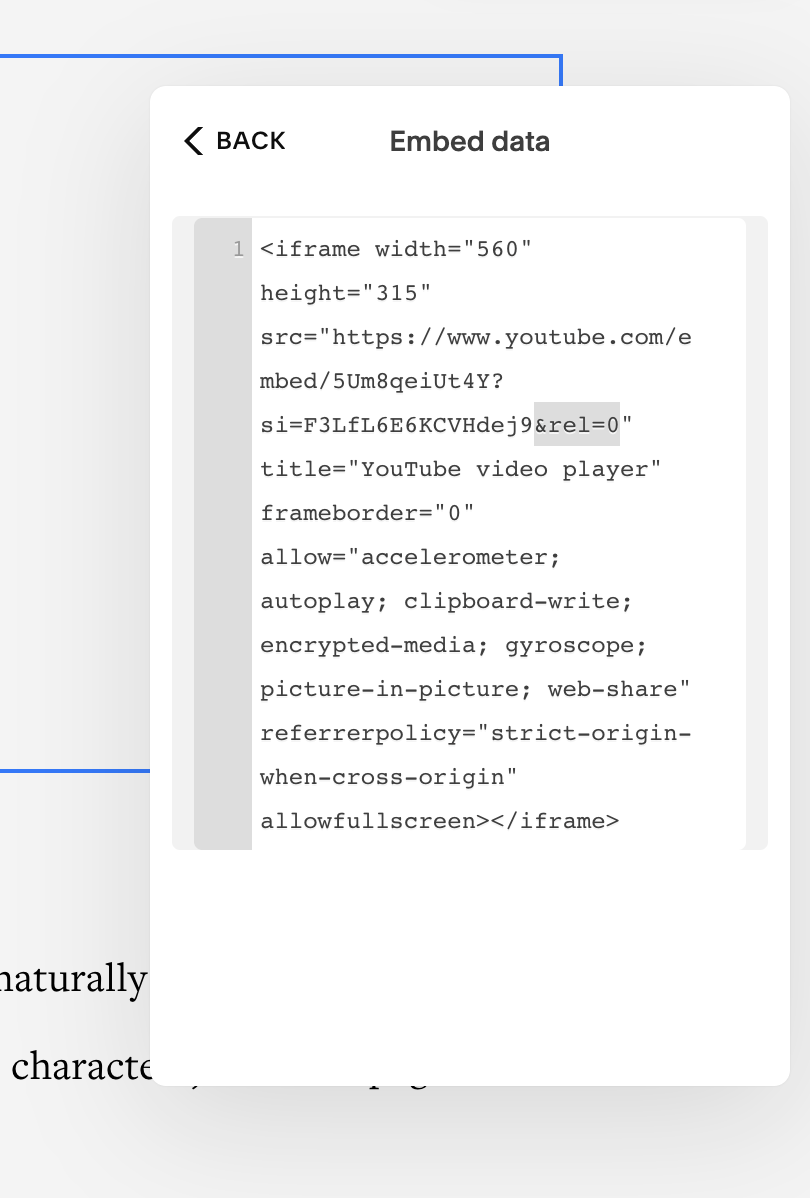
Ensuring Embedded Youtube Videos Stay On Brand
Utilizing Youtube versus Squarespace to host your videos helps with your site speed; however, by default, YouTube will autoplay related videos after yours is over. This could be competitor or off-brand videos. To prevent this from happening, when you copy the YouTube embed script, add “&rel=0”
Customizations for Mobile
While you always want to provide a great site experience for users, regardless of the device they are using, your mobile site experience is also very important for SEO. And sometimes desktop features do not work as envisioned on mobile devices. Here are some adjustments we utilize for Squarespace sites.
Hide on Mobile*
While you shouldn’t hide content or context on mobile devices for risk of penalties, you may want to hide more decorative aspects of the design if it doesn’t aid the mobile experience. For this, you will want to incorporate Squarespace ID Finder by Will Myers. This chrome extension easily allows you to hover over the section and copy the ID for later use in your code updates. The best part is that it is free! Will Myers’ site also has additional plugins and custom scripts that you can purchase.
Step 1. Find the ID of what you want to hide on mobile
Step 2. Pages → Custom Code → Custom CSS
Step 3. Add this code, updating the bolded section with your ID:
@media only screen and (max-width: 768px)
{section[data-section-id="68e59ecaa491221cfd74bb8e"]{display: none;}
}
Step 4. Save + Confirm
*Squarespace has updated this feature for 7.1 pages that have fluid engine enabled. You can now follow the steps below (will not work for an entire section):
While editing your site, resize your browser to the size where you want to hide the block, or use device view to switch to the mobile layout.
Click Edit on the page, then click the Layers icon in the top-left corner of the Fluid Engine section. This opens a list of all blocks on the section. Hovering over a block in the list highlights it in your site content.
Click the eye icon next to the block or blocks you want to hide.
Mobile Header Text Limits
If your text is too long or a word is too long, it may cut off awkwardly on mobile devices. You can fix this with some custom CSS.
Step 1. Pages → Custom Code → Custom CSS
Step 2. Add this code, adjusting the bolded sections as needed:
@media screen and (max-width:600px) {
h1{
font-size: 1.7em;
}
}
Step 3. Save + Confirm
Resize Mobile Video
Background videos can get distorted on mobile views, so in order to make sure you are providing the best mobile experience for your viewers, you can add the following CSS. Remember to utilize the Squarespace ID Finder to identify the video ID.
Step 1. Pages → Custom Code → Custom CSS
Step 2. Add this code, adjusting bolded sections as needed:
@media screen and (max-width:80px) {
[data-section-id="63d044d135db52305046f8c7"] {
min-height: unset !important;
height: 30vh !important;
}
}
Step 3. Save + Confirm
Blog Customizations
The blog is typically the one place on your site where content is continuously being updated, which creates an opportunity to add value to your site and keep your audience engaged. Here are some customizations we have utilized to improve user-experience.
Blog Sidebar by SQSP Themes
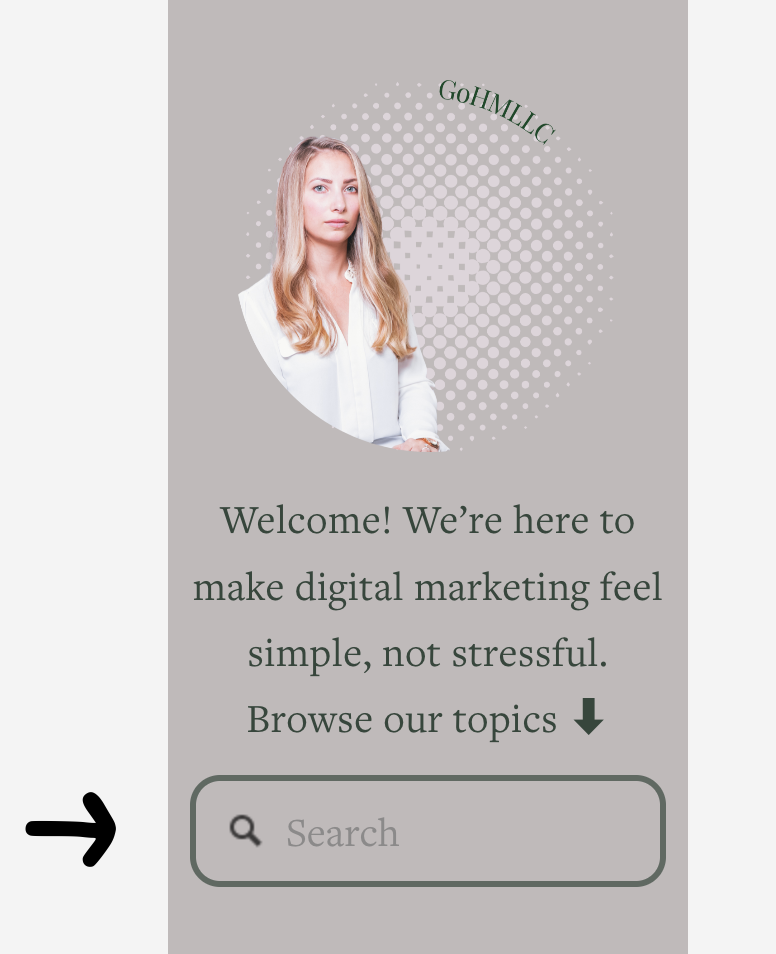
If you want your blog posts to feel more engaging, you can add a sidebar to highlight current offers, sales, newsletter signups, and more. Unfortunately, Squarespace doesn’t have this functionality natively, but you can purchase a plugin to create this feature on your site (see example to your right). They also have other plugins and scripts you can purchase to further customize your site.
The sidebar plugin will walk you through setup once you purchase, but you will want to create an unlinked page on your site that will host the content that you want included in your sidebar.
Selecting The Posts That Are Recommended in Your Blog
By default, Squarespace will show previous and next posts at the bottom of the current post. However, these may not provide the best user-experience if those posts are not topically relevant. There are two ways you can customize this experience: Purchasing a plugin or utilizing a summary block at the bottom of your post.
Once you purchase the plugin by SQSP Themes, you will be walked through the implementation steps. If you decide to go the manual route*, follow the steps below:
Add the bottom of your post select the “+” icon to add a summary block
Customize the summary block
Choose your design, sizing, and attributes
Decide on the title for the section (we prefer to remove this entirely and add a header section instead)
Select the page that content will pull from and apply any category or tag filters
Optional: Since the previous and next posts will still appear, you can remove these with custom CSS:
Step 1. Pages → Custom Code → Custom CSS
Step 2. Add this code, adjusting if needed:
section.item-pagination.item-pagination--prev-next {
display: none;
}
Step 3. Save + Confirm
*note this will need to be done manually for each blog post.
Hiding Blog Post Categories + Tags
Categories are helpful for organizing your content and helping visitors navigate your site. Similarly, tags can be beneficial for internal organization. In the early days of SEO, tags were used as a keyword tactic, but now they are not useful for the user and no longer provide a valid SEO benefit. If you utilize tags, by default, they will appear at the bottom of your blog post. If this is not something you like from an aesthetic standpoint, but you still want to utilize tags, you can add custom CSS to hide them.
Step 1. Pages → Custom Code → Custom CSS
Step 2. Add this code, adjusting if needed:
.blog-meta-item–tags {
Display: none;
}
Step 3. Save + Confirm
If you want to hide your categories from displaying on the page, you can do this within the blog post section settings.
Tags and category pages do not provide SEO value, so we recommend hiding these pages from search engines so that only your most valuable pages appear in search results. You can do this by going to your blog SEO settings and toggling the options to hide tags and/or categories from search engines.

TL;DR
While one of the best features of Squarespace is that you do not need to be a web developer to create a beautiful and functional website, it is an added bonus that, with minimal effort, you can enhance the experience of your site with a little bit of customization. If you need more tips on setting your Squarespace site up for success, check out our Squarespace SEO Guide.